
Biological Safety
The Indian Institute of Science (IISc), Bangalore, is committed to maintaining the highest standards of safety in teaching, research, and innovation. This Biosafety Manual aims to protect students, researchers, staff, the environment, and the surrounding community from potential biological risks arising from laboratory activities.
The manual outlines key aspects of biosafety, including risk assessment, classification of biological agents, biosafety levels (BSL), use of personal protective equipment (PPE), waste management, emergency response, and incident reporting. It also aligns with national regulatory requirements and best practices to ensure safe and responsible conduct of research.
All personnel working in laboratories involving biological materials are required to understand and adhere to the guidelines provided in this manual.
5.1 Good Practices
|
BSL-1 (Low Risk) |
BSL-2 (Moderate Risk) |
BSL-3 (High Risk, Aerosol Transmission) |
|
|---|---|---|---|
|
Live culture handling |
|
BSL-1 practices, and additionally:
|
BSL-2 practices and additionally:
|
|
Spore-forming culture handling |
All spore-forming cultures in the above BSL1 laboratory.
|
All BSL2 live culture practices, and additionally:
|
All BSL3 live culture practices:
|
|
Organisms' Genetic Materials Handling Practices (includes recombinant DNA (rDNA), synthetic nucleic acid molecules, and any cells, organisms, or viruses containing such molecules) |
|
All BSL2 practices and additionally:
|
All BSL3 practices
|
|
Attenuated culture handling |
|
Adhere to BSL-2 live cultures handling practices.
|
Adhere to BSL-3 live cultures handling practices.
|
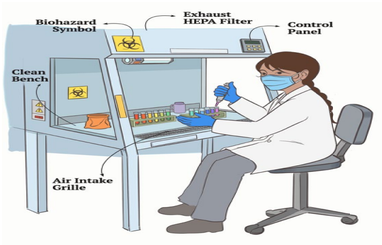 Fig 5.1 Work inside the Biosafety Cabinet and prevent contamination
5.1.1 Hazardous Equipment
- The equipment must be properly installed, maintained, and calibrated.
- All hazardous equipment must have a senior staff member or student responsible for training, maintenance, and upkeep.
- Only trained users can operate the equipment.
- Users must read the equipment manual before using and follow the SOP.
5.1.2 Hot Air Oven
- Wear PPE as per the guidelines. Heat-resistant gloves may be required.
- Don’t plug the hot air oven into an extension cord.
- Don’t overload the hot air oven.
- Don’t exceed the operating temperature limits.
- Don’t use mercury thermometers to monitor temperatures. They tend to break.
- If you have a model with an exposed heating element on the bottom, do not place items on the shelf that can potentially fall onto the heating element.
- Never put flammable, combustible, reactive, or corrosive materials inside. High-temperature-intolerant materials can cause fire.
- Be cautious of hot surfaces when loading and unloading.
- Keep your face, body, and hands away from the escaping heat when opening the machine door.
- Residual chemicals may volatilize, causing an inhalation hazard. Clean the equipment to remove residual chemicals before using.
5.1.3 Biosafety Cabinet
A biosafety cabinet (BSC) should be selected primarily based on the type of protection needed.
-
Start-Up
- Wear PPE.
- To minimize cross-contamination, materials considered “clean” must be at least 150 mm away from aerosol-generating objects.
- Biohazard collection bags should be inside the cabinet.
- Use absorbent pads on the work surface to minimize splatter or aerosol in case of a spillage.
- Do not obstruct the front or back air grilles.
-
Operations
- Minimize movements to avoid disrupting cabinet airflow.
- Please do not use a gas flame, as it interferes with airflow.
-
Shut Down
- Seal biohazard bags.
- Decontaminate the items before removing them from the cabinet.
- Decontaminate the surface of the cabinet inner sidewalls, back wall, work surface, drain pan, and the inner side of the sliding sash/hinged window.
5.1.4 Incubator
- The incubator should be switched off when not in use.
- Do not overload the incubator.
- Disinfect the incubator every 6 months or in case of a spill. Before disinfection, disconnect the incubator plug from the main socket.
- Use 70% ethanol to clean metallic surfaces (i.e., racks, floors, walls, and doors) of the incubator.
- The temperature of the incubator must be calibrated.
- Re-calibration is mandatory if the incubator has been repaired, cleaned, or restarted after a power failure.
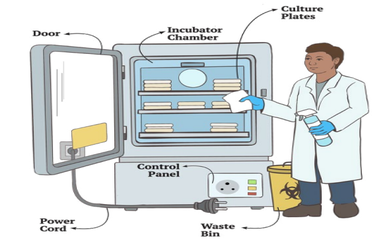 Fig 5.2 Incubator parts and cleaning points
5.1.5 Autoclave
- An autoclave sterilizes items using heat and pressurized steam. Laboratories commonly use autoclaves to sterilize glassware, non-electronic instruments, media and solutions, and biohazardous waste.
- Record cycle information on the autoclave log sheet or logbook.
-
PPE
- Always wear the minimum PPE when using an autoclave. Refer to PPE Guidelines.
- To prevent burns from heat and steam, use long heat-resistant gloves.
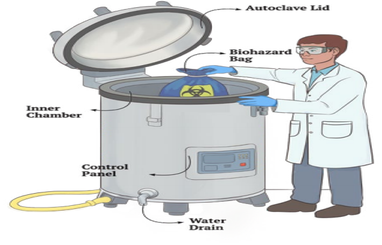 Fig 5.3 Autoclave parts and safe loading of biohazard bags
-
Pre-Inspection
- Inspect the door gasket (seal) for cracks or bulges. The gasket should be smooth and pliable.
- Clean the drain screen of debris.
- Inspect for spills or debris inside the autoclave.
- Contact the equipment in charge if you notice any problems. Do not use the autoclave.
-
Autoclaveable Items
- Do not autoclave flammable, combustible, reactive, corrosive, toxic, or radioactive materials.
- All plastics must be autoclavable.
- Inspect glassware for cracks. Do not autoclave cracked or compromised glassware.
- Loosen the caps of liquid-filled vials or cover them with foil. This allows the steam to penetrate the vial and prevent an explosion.
- Bagged items should be tied or taped loosely. Steam must be able to penetrate the bag.
-
Load
- Place items in an autoclave tub on a rack. Never place items directly on the autoclave bottom or floor.
- Always use secondary containment, just in case of spillover.
- Ensure that the autoclave has reached sufficient pressure to start a cycle.
- Do not overload the autoclave. Allow adequate space between items for steam.
- Check the water level.
- Make an entry in the logbook.
-
Unload
- Never open an autoclave door during a cycle! If necessary, abort the cycle and wait until the chamber depressurises.
- If the cycle fails, notify the equipment in charge. Items may not be sufficiently decontaminated if the cycle is not completed.
- Before unloading, verify that the chamber temperature has dropped and the pressure is zero.
- Slowly open the door to let out steam gradually. Keep your face away from the door.
- Allow items to stand in the autoclave for 10 min. Cautiously remove items and place them in a safe area to cool. Do not agitate containers, as boiling or superheated liquids can explode if moved too quickly.
- Make an entry in the logbook.
5.2 Infrastructure, PPE & Systems
|
BSL-1 (Low Risk) |
BSL-2 (Moderate Risk) |
BSL-3 (High Risk, Aerosol Transmission) |
|
|---|---|---|---|
|
Type of microorganisms |
Not known to consistently cause disease in healthy adults (e.g., non-pathogenic E. coli, etc). | Indigenous or exotic agents pose a moderate hazard; they can cause human disease but are usually treatable. (e.g., Staphylococcus aureus, Salmonella, Bacillus species, Clostridium species in their spore state, or fungal spores). | Indigenous or exotic agents with potential for aerosol transmission can cause serious or potentially lethal disease (e.g., Mycobacterium tuberculosis, Yellow Fever, SARS-CoV, Influenza, etc). |
|
Laboratory Infrastructure |
1. Open benchtop worktable. 2. A sink for hand washing. 3. Lockable doors. 4. Non-porous, easily cleaned surfaces (floors, benches, chairs). 5. Incubators 6. Oven 7. Other equipment as per the BSL1 requirements 8. Pest control. |
All BSL-1 infrastructure, and additionally: 1. Self-closing doors. 2. Biosafety cabinets (Class I or II) for aerosol-generating procedures. 3. Access to an autoclave or other decontamination methods. 4. Eyewash station. 5. Vacuum lines with HEPA filters. 6. Other equipment as per the BSL2 requirements. 7. Mechanical ventilation with inward airflow is recommended. |
All BSL-2 infrastructure and additionally: 1. Physical separation from public access corridors. 2. Self-closing, double-door access (e.g., through an anteroom). 3. Biosafety cabinets Class II or Class III. 4. A dedicated ventilation system with non-recirculated, HEPA-filtered exhaust air. 5. Sustained negative airflow into the laboratory (air pressure gradient). 6. Walls, floors, and ceilings should be sealed and easily decontaminated. 7. The hand-washing sink near the exit has hands-free operation. 8. Autoclave within the lab or immediately adjacent. |
|
Personnel Protective Equipment (PPE) |
1. Please see the PPE guidelines 2. Lab coats, gloves. 3. Eye protection/ face shields when a splash hazard exists. |
1. Please see the PPE guidelines 2. Gloves. 3. Eye protection and face shields as needed. 4. Dedicated lab coats for cell culture work. |
1. Please see the PPE guidelines. 2. Protective lab clothing (solid-front wraparound gowns, scrub suits, coveralls). 3. Gloves (double). 4. Respiratory protection (e.g., N95 mask, & respirators). |
|
Training & Qualification |
Basic lab safety & hygiene |
1. Comprehensive training on specific hazards,
PPE, and BSC usage procedures (spills, exposures). 2. All personnel handling spore-forming agents must receive specific training on the unique risks and decontamination procedures for spores. |
1. Extensive, specialized training and expertise
in BSL-3 practices. 2. Regular emergency response training (Spill, medical, containment breach). 3. Proficiency testing for aseptic technique, biosafety knowledge, and equipment operation. 4. A thorough medical status (immunocompromised, allergic reactions, latent disease, chest X-rays, vaccine status) is required. |
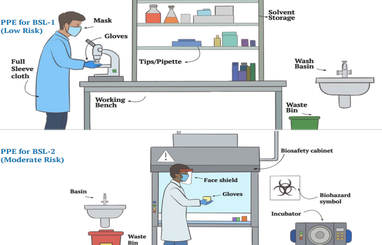 Fig 5.4 PPE for BSL-1, BSL-2 Laboratories
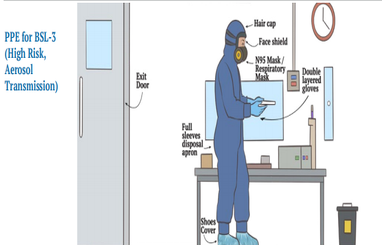 Fig 5.4 PPE for BSL-3 Laboratories
5.3 Spill Control
- Ensure the Bio-safety kit is readily available and fully stocked at all BSLs.
- Remain Calm: Assess the situation without panic.
- Self-Protection: Don appropriate PPE before initiating cleanup as mentioned in the IISc safety manual
- Contain & Decontaminate: Prevent spread and neutralize the biological agent.
- Safe Disposal: Properly dispose of all contaminated materials.
- Report and Document: Ensure all incidents are recorded for improvement and compliance with the OLSEH Guideline.
5.3.1 Bio Spill Kit Contents
- BSL-1 & BSL-2: Freshly prepared 10% household bleach solution (1:10 dilution of 5.25% sodium hypochlorite), or other lab-approved broad-spectrum disinfectant.
- BSL-3: Highly effective broad-spectrum disinfectant validated for the specific agents handled (e.g. higher concentration of bleach, peracetic acid, or specialised virucidal/sporocidal agents). Ensure sufficient quantity.
- Absorbent materials: Paper towels, absorbent pads, spill pillows.
- Biohazard bags: Leak-proof, autoclavable (especially for BSL-2 and BSL-3).
- Sharps container: Puncture-resistant.
- Tools: Forceps/tongs, dustpan, and brush (for broken glass).
-
Personal Protective Equipment (PPE):
- BSL-1: Disposable gloves, lab coats, safety glasses.
- BSL-2: Disposable gloves (consider double gloving), lab coat/disposable gown, safety glasses/goggles, face shield.
- BSL-3: Full body coverage (e.g. disposable coveralls/Tyvek suit), double gloves, head cover/bonnet, shoe covers, full face shield, and respirator (N95 or higher, or powered air-purifying respirator (PAPR) depending on risk assessment and agent).
- Warning signs: “DO NOT ENTER” / “BIOHAZARD SPILL”
- Incident report forms.
5.3.2 BSL-1 Spill
Agents: Well-characterised agents not known to cause disease in healthy adults (e.g. E. coli K-12, Saccharomyces cerevisiae)
- Alert others in the immediate area to prevent further contamination.
- Don appropriate PPE – lab coat, disposable gloves, and safety glasses.
- Cover the spill with absorbent material (e.g. paper towels).
- Carefully pour disinfectant (e.g., 10% bleach solution) over the absorbent material, working from the edge inward to prevent spreading.
- Allow recommended contact time for the disinfectant (typically 15-20 minutes).
- Wipe up the spill from the edges to the centre using fresh absorbent material. If broken glass or sharps are present, use forceps or tongs to pick them up and place them directly into a sharps container. NEVER use your hands.
- Clean the spill area again with fresh absorbent material soaked in disinfectant.
- Dispose of all contaminated materials (used PPE, absorbent materials, etc.) into a biohazard bag.
- Remove PPE and dispose of it in the biohazard bag.
- Wash your hands thoroughly with soap and water.
- Report the incident to your PI and department safety champion.
- File an incident report and submit it to OLSEH.
5.3.3 BSL-2 Spill
Agents: Agents associated with human disease, but with low individual risk (e.g. Staphylococcus aureus, Salmonella, non-aerosolised Mycobacterium tuberculosis cultures, etc).
-
Small spill (e.g. a few drops to a few milliliters,
no aerosol generation outside BSC):
- Ensure absorbent materials and biohazard bags are autoclavable if the waste requires autoclaving before disposal.
- Follow steps 1-11 of BSL-1 Spill Procedure.
-
Spill Inside a Biological Safety Cabinet (BSC):
- Leave the BSC blower on. Do not turn off the BSC.
- Don appropriate PPE – lab coat, gloves, and eye protection.
- Cover the spill with absorbent material.
- Carefully pour disinfectant over the absorbent material and the spill.
- Allow appropriate contact time, wipe the spill with paper towels, and work from the edges to the centre. Use forceps for broken glass/sharps.
- Wipe down all interior surfaces of the BSC (work surface, walls, drain pan/ catch basin if accessible) with disinfectant.
- Autoclave all cleanup materials (paper towels, gloves, etc.) before discarding them into the biohazard waste stream.
- Wash your hands thoroughly.
- Report the incident to your PI and department safety champion.
- File an incident report and submit it to OLSEH.
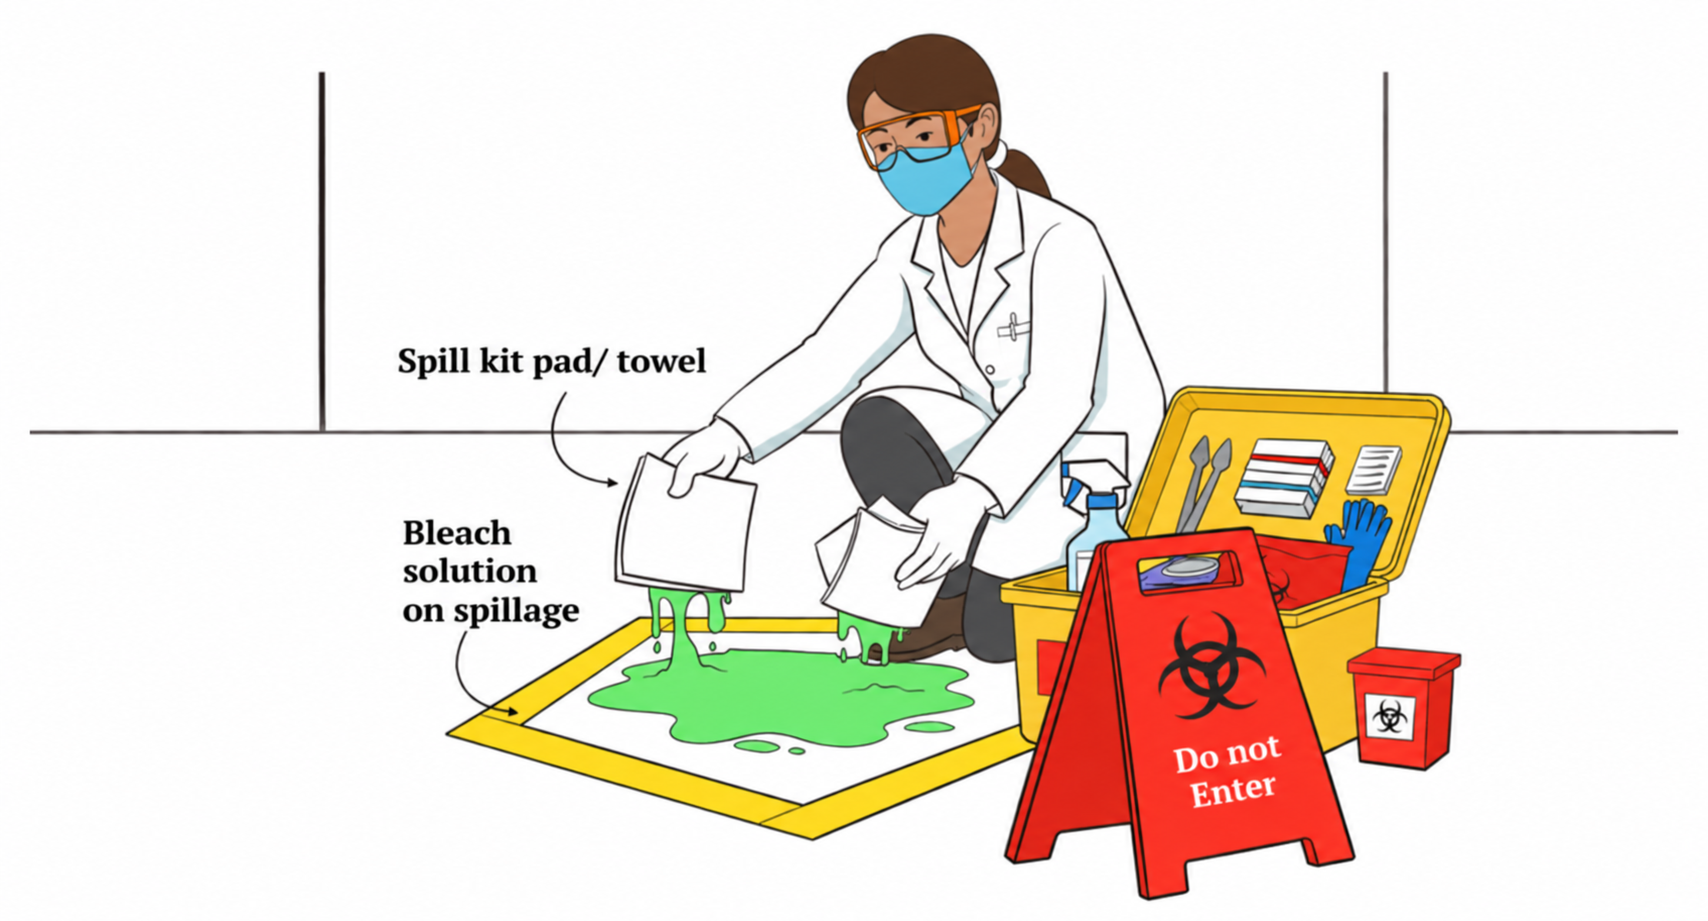 Fig 5.5 Biological spill kit contents and cleanup steps
-
Large Spill or Potential for Aerosol Generation
(outside BSC):
- DO NOT PANIC!
- Immediately vacate the area. Alert others to evacuate the laboratory.
- Close doors to the affected area to contain aerosols.
- Post “DO NOT ENTER” / “BIOHAZARD SPILL” signs on all entrances.
- Allow aerosols to settle for at least 30 minutes (this allows for air changes and settling of airborne particles).
- Contact your PI, department safety champion, and OLSEH/Biosafety Officer immediately.
- Provide details: Location, approximate volume, type of material, and any known hazards.
- Don full appropriate PPE from the spill kit: lab coat/disposable gown, double gloves, safety glasses/face shield, shoe covers, and an N95 respirator if inhalation risk is present.
- Enter the room cautiously, cover the spill with absorbent material, working from the edges inward.
- Carefully pour disinfectant (e.g. 10% bleach solution) over the absorbent material and the entire spill area, starting from the perimeter and working towards the centre. Avoid splashing or creating new aerosols. Ensure complete saturation.
- Allow adequate contact time (typically 20-30 minutes, or longer for high organic load like blood). Use forceps/tongs for sharps; dispose directly into a sharps container.
- Re-disinfect the entire spill area and any potentially contaminated surfaces (benches, equipment, walls).
- Dispose of all contaminated materials into autoclavable biohazard bags.
- Remove PPE in a manner that avoids secondary contamination. Dispose of all disposable PPE in the biohazard bag.
- Autoclave all biohazard waste as per institutional guidelines before final disposal. Wash your hands thoroughly with soap and water.
- File an incident report and submit it to OLSEH.
5.3.4 BSL-3 Spill
Agents: Indigenous or exotic agents that may cause serious or potentially lethal disease through inhalation (e.g. Mycobacterium tuberculosis (aerosolised), Brucella spp., SARS-CoV-2, etc.).
-
Evacuate:
- DO NOT PANIC!
- Immediately vacate the BSL-3 laboratory/suite.
- Alert all personnel in the BSL-3 suite to evacuate immediately.
- Activate emergency alarms and immediately notify the Security, PI/lab supervisor, and Biosafety officer/OLSEH.
- Close all doors to the BSL-3 suite and ensure primary airlock doors are secured.
- Post “DO NOT ENTER” / “BIOHAZARD SPILL - BSL-3 HAZARD” signs on all entrances.
-
Cleanup by trained personnel:
- PIs, the facility in-charge, and the Biosafety officer/OLSEH will coordinate the response.
- Allow aerosols to settle for at least 30-60 minutes, or longer as determined by risk assessment and ventilation system capabilities (e.g. multiple air changes). The directional airflow system of BSL-3 should assist in containment.
- Assess the situation remotely (if possible) and plan the cleanup strategy, considering the spill’s specific agent, volume, and location.
- Restrict lab access to only authorised cleanup personnel.
- Designate a cleanup team of at least two fully trained individuals.
-
Spill Cleanup (by trained personnel only):
- Don full, appropriate PPE for BSL-3 work, ensuring proper donning sequence and seal (e.g. disposable coveralls/Tyvek suit, double gloves, shoe covers, head cover, full face shield, and N-100 respirator with proper fit-testing or N95 Mask with a three-layered one normal mask). Consider a liquid-resistant outer layer when dealing with large liquid spills.
- Ensure the bio spill kit is complete and readily available outside the contaminated area before entry.
- Enter the BSL-3 lab/suite cautiously.
- Carefully cover the entire spill area with absorbent material to minimise aerosol generation.
- Slowly pour highly effective disinfectant (validated for the specific agent, often a higher concentration of bleach, or other virucidal/sporocidal agent) around the edges of the spill, working inward. Ensure complete saturation. Avoid splashing.
- Allow extended contact time for the disinfectant (e.g. 30 minutes or more, depending on the agent and disinfectant specifications).
- Carefully collect all contaminated materials (absorbents, disposable PPE, broken glass/sharps in sharps containers) using mechanical means (forceps, tongs, scoop). Place everything into autoclavable biohazard bags.
- Thoroughly disinfect all potentially contaminated surfaces (work surfaces, equipment, walls, floor, handles, light switches, BSC exterior) with fresh disinfectant. This may require multiple wipes.
- If the spill was in a BSC and containment was compromised, the BSC itself must be decontaminated, possibly through gas decontamination using formaldehyde, chlorine dioxide, and hydrogen peroxide, by trained personnel after the immediate spill cleanup.
- Clean the spill area again with fresh disinfectant.
-
Doffing & Decontamination:
- Perform doffing of PPE in the designated BSL-3 exit area/anteroom following a strict, pre-determined sequence to prevent contamination of personal clothing.
- Place all disposable PPE into autoclavable biohazard bags.
- Autoclave all biohazard waste generated from the spill cleanup and contaminated PPE immediately, per institutional and BMW2018 guidelines. This is critical for BSL-3 waste.
- Wash your hands thoroughly with antiseptic soap and water.
-
Post-Spill & Reporting:
- File an incident report and submit it to OLSEH.
- Replenish the BSL-3 spill kit.
- Consider environmental monitoring (e.g. surface swabs) to confirm complete decontamination, especially for high-risk agents.
5.3.5 Spill On Body/Clothing
- Immediately remove contaminated clothing while minimising contact with skin.
- Wash exposed skin thoroughly with antiseptic soap and water for at least 15-20 minutes.
- Immediately flush eyes at an eyewash station for at least 15 minutes for eye exposure.
- Seek immediate medical attention. This is critical for BSL-2 or BSL-3 agents, and post-exposure prophylaxis (PEP) may be necessary. Inform the IISc Health Centre of the specific agent
- . File an incident report and submit it to OLSEH.
- Contaminated clothing should be placed in an autoclavable bag for proper decontamination (e.g., autoclaving or specialised laundry).
5.3.6 Biowaste Disposal As Per BMW Rules, 2018
| Category | Type of Waste | Colour and Type of Container | Treatment and Disposal Options |
|---|---|---|---|
Yellow

|
|
Yellow colour non-chlorinated plastic bags or containers (with biohazard symbol) |
|
Red
|
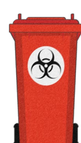
Contaminated waste (Recyclable) such as tubing, drains, oxygen masks, intravenous tubes, urine bags, gloves, and disposable items other than sharps | Red colour non-chlorinated plastic bags and containers (with biohazard symbol) | Autoclaving followed by Recycling. Needles of syringes must be cut/destroyed with a needle destroyer/cutter before putting them in red bags. |
White
|
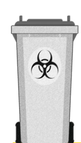
Waste Sharps, including metals (needles, syringes with fixed needles, needles from needle tip cutter/burner, scalpels, blades, or any other contaminated sharp object that may cause puncture and cuts) | White colour, puncture-proof, leak-proof, tamper-proof containers (with biohazard symbol) | Autoclaving or Dry Heat Sterilisation in the lab, followed by Shredding or Chemical treatment in an authorised common biomedical waste treatment facility. |