
Laser & Radiation Safety
Lasers can cause severe, often irreparable, eye damage. Radiation hazards commonly come from radioactive sources, high-energy ionizing radiations like X-rays, and high magnetic fields. Many of these cause irreparable long-term health issues.
Laser Safety
- A laser produces an intense, highly directional beam of light. High-power lasers can cause damage to the eyes and skin, and in extreme cases cause blindness (Figure 7.1).
- In general, we should never come in the way of laser light. Do not stare at a laser, ever.
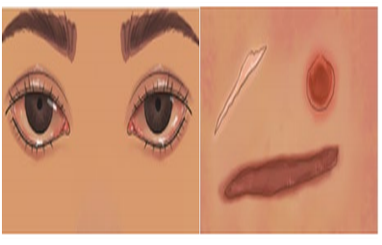 Fig 7.1 Damage caused to eyes (retina and cornea) and skin by highpower lasers.
7.1.1 Hazard
- Eyes are essentially transducers for visible light. Light entering the cornea has an aperture of 7 mm when fully dilated. This light is focused to a 10 to 20 μm point on the retina, a concentration of 105 . At high irradiance, the concentrated energy causes local heating that burns the pigment epithelium and the adjacent light-sensitive rods and cones. This results in temporary or permanent loss of vision.
- Table 7.1 below shows the calculated distances at which lasers with typical beam spreads are dangerous to the eyes. These are guidelines. Lasers can be hazardous even beyond these distances.
- Damage to the eye also depends on the laser wavelength (Figure 7.2). Wavelengths within 380– 1400 nm go through the cornea and are absorbed in the retina. Wavelengths shorter than 380 and longer than 1400 nm are absorbed in the cornea or lens. Either can cause significant damage to the eye and is extremely painful.
- Damage to the retina is usually irreparable, so 380– 1400 nm lasers are more dangerous.
- However, given the lack of aversion, longer wavelength lasers (>1400 nm) must be taken just as seriously.
- UV light is dangerous at all powers because UV causes photochemical damage in addition to thermal damage. This damage is accumulative even at very low powers (See Section 7.1.3 on MPE & Figure 7.2)
- Pulsed lasers deliver all the power in very short pulses (10 us to less than fs). So, Pulsed lasers can have extremely high peak power but a low average power. Pulsed lasers are characterised by Energy density (J/cm2 ).
- A pulsed laser can also have a high pulse repetition rate (several MHz), so thousands of pulses are delivered in the 0.25 s it takes for you to blink.
- The biological effect of irradiance on skin can vary from mild erythema to severe blisters. At very high irradiance, pigmentation, ulceration, and scarring of the skin and damage to underlying organs may occur.
- Exposure can also be varied. Worst is a direct hit from the primary laser beam. However, reflections off a shiny surface can be just as bad. Reflections off a rough surface are less severe but also complex to detect, hence dangerous (Figure 7.3).
| Class |
Output Power |
Hazard |
Engineering control |
Training |
Regular Eye Test |
|---|---|---|---|---|---|
| 1 | Typically, when a laser is not accessible. Non-hazardous to the eye | Not required | Not required | Not required | |
| 1M | Hazardous when collecting optics (e.g., with microscopes) | Not required | Not required | Not required | |
| 2 | 0–1 mW | Hazardous only when the person overcomes aversion response | Not required | Not required | Not required |
| 2M | Hazardous with collecting optics and/or Class 2 hazard | Not required | Not required | Not required | |
| 3R | 1–5 mW | Hazardous when the person overcomes the aversion response | Yes | Not required | Not required |
| 3B | 5–500 mW | Direct beam eye hazard. No serious injury from diffuse reflection to the eye or skin | Required | Required | Suggested |
| 4 | >500 mW | Hazard to the eye and skin from direct, specular, or diffuse reflection. Fire hazard | Required | Required | Suggested |
| Laser | Eye hazard distance or nominal ocular hazard distance (NOHD) up to which beam power is > 2.5 mW/cm2 | Flash blindness distance up to which the beam power is > 100 µW/cm2 | Skin burn distance | Fire hazard distance |
|---|---|---|---|---|
|
Class 2 0.99 mW, 532 nm |
14 m | 67 m | 0.9 m | 0.6 m |
|
Class 3R 4.99 mW, 532 nm |
32 m | 149 m | 2.1 m | 1.4 m |
|
Class 3B 499 mW, 532 nm |
158 m | 747 m | 10.5 m | 7.0 m |
|
Class 4 5 W, 532 nm |
250 m | 1182 m | 16.6 m | 11 m |
7.1.2 Laser Classification
- Lasers can be classified based on power, wavelength, and mode.
- Visible CW lasers (400–700 nm) are categorized into classes based on their power. Modern ANSI/ IEC classification is preferred (see table below). Class 1 lasers have the lowest hazard, and Class 4 lasers have the highest. Exposure time is expected to be less than 0.25 s. The system assumes that the user will have an aversive reflex to prevent longer exposures.
- Non-visible IR lasers (> 700 nm) do not generate any aversion reflex. This significantly increases the possibility of more prolonged exposure, which is very dangerous. Even at lower powers, there is a significant risk of losing eyesight.
- UV lasers (180 to 400 nm) are another class of non-visible lasers. Due to their very high photon energy, UV lasers are dangerous at all powers. The exposure limits are lower than those of other lasers (See section on MPE)
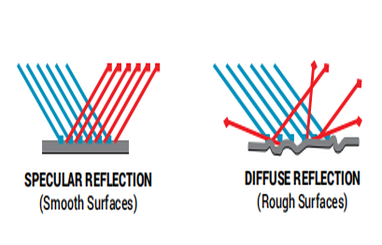 Fig 7.2 Specular vs Diffuse reflection of laser beam
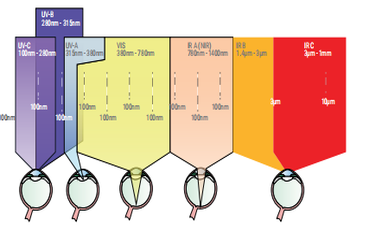 Fig 7.3 Effect of laser wavelength on various parts of the eyes. Retina
damage is irreparable. Cornea and lens damage is extremely painful.
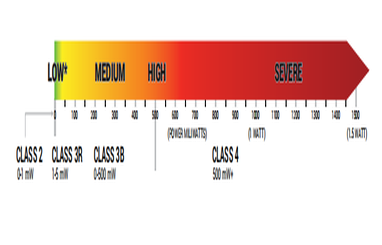 Fig 7.4 Laser classifications based on power levels
7.1.3 Maximum Permissible Exposure
- The safe levels for the eyes are given by the Maximum Permissible Exposure (MPE). MPE is usually about 10% of the dose that has a 50% chance of creating damage, under worst-case conditions.
- . MPE depends on wavelength and exposure duration. IEC-60825-1 and ANSI Z136.1 standards include methods of calculating MPE.
- The MPE as per IEC 60825 is given in Table 7.4. For most CW lasers, an MPE of 1 mW/cm2 is reasonable. The only exception is deep-UV, whose MPE is lower for exposures beyond 1 second.
- MPE calculations for pulsed lasers are much more complex. Standards like ANSI provide tables for calculating MPE. Details are beyond the scope of this document.
- MPE values can also be calculated for skin exposure.
7.1.4 PPE: Safety Eyewear
- Appropriate eye protection must be worn with Class 3 and above lasers. Eye protection is also required for any non-visible laser.
- Always wear laser safety glasses whenever lasers are in the same room, irrespective of whether you are using that laser or not.
- Laser safety eyewear reduces the intensity of the laser beam. The amount of attenuation depends on the class and wavelength of the laser.
- Safety eyewear must follow the ANSI Z136, IEC 60825, or EN 207. These standards correlate safety with transmittance. Transmittance (T) is specified by optical density. Higher OD is higher protection.
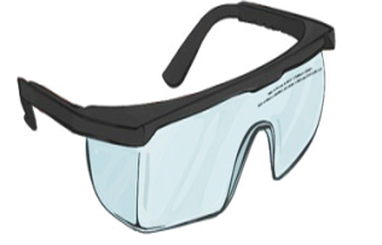 Fig 7.5 Laser Safety Goggle with Safety Rating
-
Calculate the intensity of the CW laser
(Einc) in mW/cm2. If the beam
diameter is more than 7 mm, use the eye aperture
area (0.385 cm2) to calculate intensity.
Peak Power Min OD 10 mW/cm2 1 103 mW/cm2 3 106 mW/cm2 6 Otherwise, use beam diameter to estimate intensity.
- Check the MPE from Table 7.4. For most wavelengths, an MPE of 1 mW/cm2 is reasonable.
-
Calculate the required minimum OD for eyewear.
OD > log10 ( Einc / 1mW/cm2 )
- For pulsed and mode-locked lasers, use the European standard, EN207 (See Table 7.3). EN207 accounts for mode, power, and pulse duration.
- EN207 establishes an Lb-Rating. Lbn is like OD. Higher Lbn, means more protection.
- The correct choice of laser safety is nuanced. Always discuss the need with your PI.
7.1.5 PPE: Clothing
- Diffused reflection from Class 4 lasers is hazardous to the skin and eyes. To minimise exposure, wear full-sleeved clothing. This can be aprons or lab coats. Full shirts and trousers made of tightly woven fabrics can also be used.
- For class 4 lasers, sun screens are a good idea.
7.1.6 Other Engineering Controls
- The following engineering controls are needed for class 4 and non-visible lasers. They are also good practice for class 3 lasers.
- The laser must be confined to an optical table or an enclosed beam path.
- The optical table should have laser safety curtains, laser barriers, and blackout materials to prevent light from leaving the experimental setup area.
- Carry out experiments on an optical table such that all laser beams travel horizontally.
- A warning light must be installed at the entrance of the door.
- Safety eyewear must be stored outside the room or in a partition housing the laser.
7.1.7 Best Practice
- Wear PPE at times, irrespective of the laser condition.
- Always check if the laser safety eyewear is adequate for the laser before use.
- Never look directly at the laser beam. Even if you are wearing PPE.
- For Class 2 lasers or above, post appropriate warning signs and labels near the laser and rooms.
- Rooms with Class 3 lasers or above must have all windows and doorways blacked out so that the laser never leaks out.
- Class 3 lasers and above must be installed in a dedicated workspace, with wall-to-floor partitions. No safety eyewear works at all wavelengths, so simultaneously using lasers with different wavelengths in the same area is dangerous.
- Do not use a class 3 or above laser with telescopes, microscopes, or alignment devices without approval from the PI. This can increase the irradiance and hence the hazard.
- Turn off the laser before making any changes to the optics in the beam path.
- Do not place laser beams at eye level.
- Do not allow objects that cause unexpected reflections in the beam path, e.g., metallic buttons, screw heads, watches, or jewellery.
- Be aware that lenses and other optical devices may reflect a portion of the incident beam from the front or rear surface.
- Operate a laser at the minimum power necessary for any operation.
- Exposure to laser radiation must be kept below the MPE under all conditions of operation or maintenance.
- The general illumination level of the lab should be high so that the pupils can read it, reducing the hazard.
- Removal of protective housing or system modification can increase a laser’s classification. Beware!!
| Laser Mode | Energy Symbol | Pulse Duration |
|---|---|---|
|
Continuous Wave (CW) |
D | > 0.25 seconds |
| Pulsed Mode | I |
> 1 micro second – 0.25 s |
| Giant Pulsed Mode | R |
1 nano second – 1 µs |
| Mode Locked | M | < 1 nano second |
| Wavelength |
Laser Mode |
Max Power Density (P) or Max Energy Density (E) |
Min LBn |
|---|---|---|---|
| 180–315 nm | D | 1×10⁻⁷ W/cm2 | log10(P)+3 |
| I & R | 3×10⁻³ J/cm2 | log10(E/3)−1 | |
| M | 3×10⁶ W/cm2 | log10(P)−10 | |
| 315–1400 nm | D | 1×10⁻³ W/cm2 | log10(P)−1 |
| I & R | 5×10⁻⁷ J/cm2 | log10(E/5)+3 | |
| M | 1.5×10⁻⁸ W/cm2 | log10(E/1.5)+4 | |
| 1.40–1000 µm | D | 1×10⁻¹ W/cm2 | log10(P)−3 |
| I & R | 1×10⁻² J/cm2 | log10(E)−2 | |
| M | 1×10⁷ W/cm2 | log10(P)−11 |
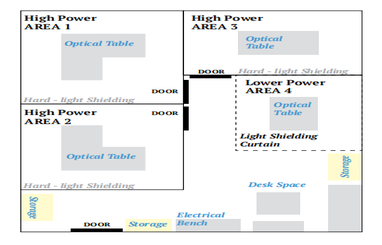 Fig 7.6 Layout of the high-power laser lab at CeNSE, showing separate workspaces.Courtesy Prof. Supradeepa
Ultraviolet Safety
- All radiations of wavelengths shorter than 350 nanometers should be considered dangerous.
- Protective safety eyewear with UV-absorbing lenses should be worn if there is a chance of accidental eye exposure.
- Skin exposed to intense UV radiation may result in skin damage and should be adequately protected.
Guidelines of Radiological Safety of Sealed Sources
Radiation can cause painful burns. So, be fully clothed while working under UV radiation. UV lights are often used to sterilize indoor spaces. In such cases, please make sure the room has tinted/plastic windows so that UV light does not escape.
GIC 5000/BI 2000 is a self-contained, dry source storage chamber of Category I, sealed gamma radiation emitting source of high intensity. The gamma radiation-emitting sources are often Caesium or Cobalt 60. Such sources are mainly used for irradiating blood/tissue or even smallsized animals. The exposure rates measured at 1 meter from the accessible surface of the GIC should be within the permissible limit.
Sealed sources (Gamma Irradiation Chambers-GIC 5000 / Blood Irradiator 2000)
- Be familiar with the basic design, operation, and preventive maintenance of the GIC unit, including procedures for routine operation and handling emergency situations.
| Occupational Worker |
Apprenticeship & Trainee |
Public |
|---|---|---|
|
|
|
- Operate the GIC unit as per the standard operating procedures (SOP) prepared by Radiation Safety Officer (RSO) from the detailed instruction manual provided by the manufacturer/ supplier of the GIC unit.
- Follow all applicable rules and regulations for the safe operation of the GIC unit.
- Ensure proper handling and placement of the sample/product inside the sample chamber based on the dose profile of the sample chamber.
- Maintain a logbook for the use and operation of the unit, including personnel details and details about the samples/ objects under irradiation, dose rate, dose delivered, and time of irradiation.
- Make proper use of protective equipment, radiation monitors, and personnel monitoring devices as provided.
- Report to RSO/licensee of any issues related to the safe operation of the GIC, including the circumstances that could adversely affect the safe operation of the GIC unit.
- Be familiar with area security safeguards such as locks, posted signs, warning lights, and interlock systems.
- In case a female worker becomes aware of being pregnant, notify the employer, licensee, and RSO so that the working conditions can be modified as necessary.
Decommissioning and Disposal Procedure:
- Licensee shall obtain prior approval from the Competent Authority for decommissioning, transport, and safe disposal of radioactive material by submitting the application in the prescribed format.
- Upon obtaining the approval for decommissioning, the licensee should approach the manufacturer/ supplier for decommissioning and transportation of disused sources in the GIC unit.
- The room housing the GIC can be released for any other use by the institution only after decommissioning of the GIC installation.
- The transportation of GIC units from the manufacturer/supplier institution to the user institution and vice-versa should be carried out by adhering to the security guidance specified in AERB Safety Guide on ‘Security of Radioactive Material during Transport’ [AERB/NRF-TS/SG-10, (2008)].
- Before disposal/transfer, the spent/disused source must be characterized: radionuclide content, activity, history, inventory etc.
- Integrity of the sealed source must be verified; if the housing is contaminated / damaged or there’s risk of leakage/ contamination – special precautions must be taken
- Sources must be packed, marked, labelled and transported in compliance with AERB transport regulations
- If not immediately returned, an exclusive safe and secure storage facility (temporary storage) must be provided until transfer/disposal.
- If the source housing or associated device is contaminated (fixed or non-fixed contamination), then those components must be separated and treated as radioactive waste. Such waste must be disposed of via authorised waste-management routes.
- Disposal or transfer (return to supplier or to authorised waste manager) requires explicit prior authorisation from AERB.
- Transfer for disposal abroad (export) also requires permission from AERB, and compliance with both domestic and international transport regulations.
Emergency response plan:
-
The emergency response plan should be as per
Rule 33 of the Atomic Energy (Radiation Protection)
Rules, 2004, in coordination with the Radiation
Safety Officer (RSO), which envisages various
emergency scenarios/situations that may be
encountered, and action plans for responding
to emergencies to mitigate their consequences.
To ensure prompt, safe, and coordinated actions
during incidents involving sealed radioactive
sources, including:
- Loss or theft of a source
- Suspected or confirmed damage to the sealed source capsule
- Fire, explosion, or natural disasters involving the source
- Accidental exposure to personnel
- Transport accidents involving a source
-
STOP–Warn–Evacuate
- Stop the operation immediately
- Warn all personnel in the area
- Evacuate non-essential persons
- Prevent public entry into the affected area
-
Initial Radiation Survey
-
Performed by the Radiation Safety Officer
(RSO) using:
- Survey meters (GM detector)
- Dosimeters
-
Performed by the Radiation Safety Officer
(RSO) using:
-
Establish Controlled Zones
- Hot Zone: High radiation–entry only with RSO authorisation, barricade the area to prevent unauthorized access/entry.
-
Specific Emergency Scenarios & Required Actions
-
Dropped or Damaged Source Capsule
- Do not touch the source
- Evacuate and restrict entry
- Survey to verify if capsule integrity is intact
- If leak suspected → treat as contamination incident, apply wipe tests
- Inform AERB immediately
-
Fire in Source Storage or Facility
- Use fire extinguishers without approaching the source
- If safe: isolate electricity, close fire doors
- After fire is controlled, RSO performs a radiation survey
- Ensure source is intact and shielding is effective
- Report to AERB
-
Loss or Theft of Sealed Source
- Notify RSO, employer, local police immediately
- Preserve CCTV, records
- Evacuate & secure the facility
- Inform AERB within 24 hours (immediately for high-activity sources)
-
Transportation Accident
- Follow instructions in Transport Code
- Secure area, warn public, and prevent ignition sources
- Notify AERB, consignor, and local authorities
- Radiation survey before moving the package
-
Dropped or Damaged Source Capsule
-
Incident Report to AERB (Mandatory) Include:
- Description of incident
- Source type, activity, category
- Personnel doses
- Corrective actions
- Preventive measures
-
Post-Emergency Actions
- Final radiation survey
- Medical evaluation of exposed workers
- Root-cause analysis
- Implementation of corrective & preventive actions
- Submission of detailed report to AERB
Guidelines of Radiological Safety of Unsealed Sources
Setting up a radiological laboratory at IISc requires a systematic approach based on the Atomic Energy Regulatory Board (AERB) guidelines. The process involves classifying the lab, ensuring proper facilities and equipment, and adhering to strict safety protocols for handling radioactive materials.
7.4.1 Laboratory Classification
First, we must determine the appropriate lab classification based on the specific radionuclides used and the planned activities.
Radionuclides are categorised into four groups based on their radiotoxicity.
- Group I: Extremely high radiotoxicity, including Po210, Ra226, Pu239, Am241 etc.
- Group II: Highly toxic, like I125, Co60, and Cs137 etc.
- Group III: Medium to low toxicity, like C14, P32, S35, and I135 etc.
- Group IV: Low toxicity, like H3, C14, P32 etc.
7.4.2 Laboratory Type
Based on the Type and quantity of radionuclides being handled, laboratories are classified into three types. The quantity is measured in becquerels (Bq), a unit of radioactivity
| Group of Radionuclides |
Type I (Low) |
Type II (Medium) |
Type III (Stringent) |
|---|---|---|---|
| I | < 185 kBq |
185 kBq - 185 MBq |
> 185 MBq |
| II | < 1.85 MBq |
1.85 MBq - 1.85 GBq |
> 1.85 GBq |
| III & IV | < 18.5 MBq |
18.5 MBq - 18.5 GBq |
> 18.5 GBq |
For example, using normal chemical operations with less than 1.85 MBq of a Group II radionuclide would require a Type III laboratory. However, handling more than 1.85 MBq of the same radionuclide would necessitate a Type II laboratory. You must choose the lab type corresponding to the highest activity and most toxic material you plan to handle. At IISc, we have Type-I at MBU and Type-II at DBG, MCB and BC. Type III lab will need special permission.
7.4.3 Lab Requirements
Once the laboratory type is determined, we must ensure the facility meets the specific requirements for that classification as per AERB (SC/LAB/01, 2016). The following are basic requirements for all labs:
- Dedicated rooms or partitions with strict and logged access control.
- Table and floor surfaces that are non-absorbing, smooth, unbroken, and easy to decontaminate. Porous materials like wood or concrete are forbidden.
- Contamination monitor
- GM Counter
- Dedicated storage that is not shared with non-radioactive materials
- PPE: lab coats or aprons, disposable nitrile gloves, closed shoes (no sandals), and safety glasses. Replace with safety glasses with goggles if splashing is possible.
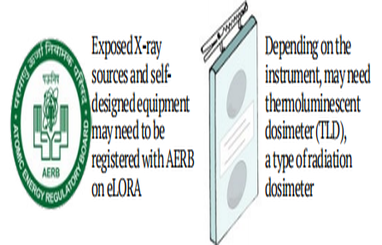 Fig 7.7 Requirements of AERB registration and TLD dosimeter
- Remote handling tongs and remote pipettes.
- Foot-operated dust bins.
- The airflow should move from areas of no activity to areas of low, medium, and then high activity
- Unique personnel dose monitoring (TLD) badges for each user. OLSEH issues these free of charge. You must surrender the old one and get a new badge every quarter.
| Type I (Low) | Type II (Medium) | Type III (Stringent) | |
|---|---|---|---|
|
General description |
Specialised lab | Specialised lab with exhaust, fume hood, & intrusive monitoring. | Very specialised labs, like a cleanroom or BSL3/4 labs. |
| Layout | At least two rooms, one for handling materials and one for counting or preparation samples. | Three or more rooms for storage, preparation, and handling | Three or more rooms for storage, preparation, and handling |
| Surface | Non-absorbent & smooth wall surfaces | Non-absorbent & smooth wall surfaces. | |
| Work-area | Bench or table, but only if gaseous release is not expected | All work inside the fume hood with −50 to −200 Pa relative pressure |
All work inside a dedicated glove
hood with −200 to −250 Pa relative
pressure Outlet connected to exhaust. |
|
Ventilation (air inlet) |
Proper ventilation with 6 to 12 air changes per hour | Active AHU with 12 to 15 air changes per hour | Active AHU with 15 to 20 air changes per hour |
|
Exhaust (air outlet) from glove box, hood & storage |
1. No air recirculation 2. Dedicated exhaust system discharging air 120-150 cm above the roof of the tallest surrounding building |
1. No air recirculation 2. Dedicated exhaust system discharging air 120-150 cm above the roof of the tallest surrounding building 3. Inline HEPA filter & charcoal filter |
|
|
Negative room pressure |
−2.5 to −8 Pa is recommended |
−10 to −20 Pa. Pressure cascades from corridor → prep room → main lab → fume hood / glove box. |
−20 to −30 Pa. Pressure cascades from corridor → (0 Pa) → gowning area (−5 Pa) → main lab (−15 to −20 Pa) → containment room (−25 to −30 Pa). |
| Storage | Ordinary chemical storage with exhaust | Storage safe made of concrete, steel, or lead for shielding, with exhaust (Thickness of lead cabinet 4-6mm) | Glove box with exhaust |
|
Additional PPE |
- |
1. Antistatic & disposable overall
(e.g. Tyvek) 2. Double disposable gloves. 3. Safety goggles, plus a face shield if splashing is possible. 4. N95 masks 5. Head cover 6. Dedicated shoes or shoe covers |
1. Full protective suit (e.g. Tyvek).
May need a lead apron. 2. Double gloves that are changed often. 3. Safety goggles, plus a face shield if splashing is possible. 4. P100 respirator or PAPR 5. Head cover 6. Dedicated shoes or shoe covers. |
|
Additional Monitoring |
- | Radiation survey meter and contamination monitor. | Radiation survey meter and contamination monitor. |
Operational and Safety Protocols
Finally, the laboratory must follow the strict operational and safety guidelines of AERB to prevent contamination and exposure.
-
General Guidelines
- Lab Grouping: All rooms for a radioisotope laboratory should preferably be grouped.
- Facility Usage: Experiments must be conducted in the appropriate approved facilities by AERB. For example, if the limit for a Type I lab is exceeded, the work must be moved to a Type II facility.
- Segregation: Ensure sufficient area is allocated for each task, including receiving and storing radioisotopes, preparation and application of nuclides, sample counting and measurement, and temporary storage and disposal of radioactive waste.
- Containment: Fume hoods and glove boxes are mandatory for containing hazardous materials in Type II and III labs, to prevent the spread of radioactivity.
- Decontamination: All surfaces must be easily decontaminated. Flooring should be non-porous.
- PPE: PPE should be worn at all times. At the very basic, this means lab coats or aprons, disposable nitrile gloves, closed shoes (no sandals), and safety goggles. Replace with safety glasses with goggles if splashing is possible. Type II and III labs will need more.
- Personnel: Personnel monitoring badges must be worn to track radiation exposure. People must attend OLSEH offline radiological safety training in every six months. People must attend radiological safety test before handling radiological works.
- Shielding: Appropriate shielding (e.g., lead or concrete) is essential for protection against gamma radiation.
- Training: AERB mandates training for professionals working with radiation sources. OL-SEH training attendance is must for all the users of IISC. OLSEH will conduct radiological safety training in every six months.
-
Segregation & Classification of Waste AERB guidelines mandate the segregation of radioactive
waste at the point of generation. This means separating
waste based on:
- Physical state: Solid, liquid, or gaseous.
- Isotope: Isotopes with short half-lives (e.g., P-32, I-131) are separated from those with long half-lives (e.g., C-14, H-3).
- Activity: Low-level, intermediate-level, and high-level.
- Chemical and biological properties: For example, liquid waste containing hazardous chemicals must be managed separately.
- Waste Minimisation: The AERB emphasizes the principle of “as low as reasonably achievable” (ALARA) in waste management, which includes minimising the generation of radioactive waste.
-
Packaging and Containment
- Approved Containers: Waste must be placed in substantial, secure containers to prevent leakage, spillage, and contamination. The container should be appropriate for the Type and activity of the waste.
- Labelling: Each container must be clearly and conspicuously labelled with the trefoil symbol (international symbol for radioactivity), the name of the radionuclide, the activity in Becquerel (Bq) or Curie (Ci), and the date of waste generation.
- Shielding: Adequate shielding, such as lead containers or lead foils, should be used. This is particularly important for gamma-emitting isotopes.
- Trained Personnel: Only personnel who have undergone appropriate radiation safety training and are authorised by the RSO can handle and transport radioactive waste.
- Use of Carts and Trays: The containers should be transported on a trolley or in a secondary containment tray to prevent accidental drops and spills, especially for liquid waste.
-
Disposal of radiological waste at IISc:
- The cans carrying the liquid waste must be filled only to three-fourths of the can’s capacity.
- These cans must be closed tightly (in addition to the lids, stoppers are compulsory) and sealed with tape. Any radioactive spillage resulting from negligence or improper sealing would be brought to the notice of the respective PI and RSO.
- The radioactivity solid waste must be packed in a cardboard box (BRIT box or Ayxgen box) and must be well-sealed.
- The box should have the following details: PI/ lab name, radioisotope name, date of purchase and disposal, volume, and activity.
- Radioactive waste arising from different isotopes must be compulsorily packed separately and labelled precisely.
- OLSEH will publish email with waste disposal google form in IISc intra groups for the disposal of radiological wastes one time in a month.
- In general, OLSEH follows the second Thursday of each month for the disposal of radiological waste.
- Radiological waste pick up vehicle will attend the requested waste pick-up locations at department.
- People must bring wastes in LEAD cabinet trolleys with the details of radio isotopes waste in waste disposal forms.
- OLSEH will transport waste to the designated radiological waste shed at IISc for the storage.
- People must wear TLD badges while transporting radiological waste to the pickup vehicle or to the waste shed.
-
Emergency Response in Case of Spill or Exposure
- Immediate Action: Stop, Warn, and Isolate
- Stop the spill: The first and most critical step is to immediately stop the source of the spill, if it can be done safely without further contamination. This could involve uprighting a container or turning off a valve.
- Stop all work: All personnel in the immediate vicinity should stop what they are doing to assess the situation.
- Warn others: Alert other individuals about the spill to prevent them from entering or spreading the contamination.
- Isolate the area: Immediately cordon off the contaminated area with ropes, warning signs, or other barriers. This creates a “controlled area” and prevents unauthorised entry.
- Notify the Radiation Safety Officer (RSO): The designated RSO of the institute must be notified immediately. The RSO is the key person responsible for responding to a radiological emergency.
-
Personnel Decontamination and Monitoring
- Check for personal contamination: Anyone who may have been in contact with the spill material should immediately check their hands, clothes, and other exposed body parts using a contamination monitor.
- Remove contaminated clothing: If clothing is contaminated, it must be carefully removed and placed in a designated plastic bag or container for radioactive waste. It's crucial to remove clothing in a way that avoids further spreading the contamination.
- Monitor after washing: The affected body areas should be monitored again after cleaning to ensure that contamination has been removed.
-
Spill Cleanup and Decontamination
- ALARA Principle: The cleanup process must be conducted in line with the “As Low As Reasonably Achievable” (ALARA) principle, which means minimising radiation exposure as much as possible.
- Personal Protective Equipment (PPE): Personnel involved in the cleanup must wear appropriate PPE, including lab coats, disposable gloves, shoe covers, and, if necessary, respirators or face shields.
- The spill liquid should be contained and absorbed using absorbent paper or pads. A moistened absorbent paper can prevent dust from becoming airborne for solid spills.
- The cleanup should proceed from the perimeter of the spill towards the centre to prevent the spread of contamination.
- All contaminated items must be placed in a clearly labelled radioactive waste bag or container, including gloves, absorbent paper, and other materials.
- After the visible spill has been cleaned up, the area must be surveyed meticulously with an appropriate radiation monitor to ensure that all residual contamination has been removed.
-
Incident reporting & Investigation
- In case of any radiological violations, spillage, contamination, modification of radiological practices, or unauthorised access, please inform IISc RSO immediately.
- A comprehensive report must be prepared using the incident report template.
- The RSO will conduct a detailed investigation of the incident to determine the cause of the spill, the radiation doses received by personnel, and the effectiveness of the response.